3D Printer User Guide : Mesh details
The AppCam Pan/Tilt HD Indoor WiFi Camera OVERVIEW

Uniden’s AppCam system works with your smartphone or wireless device to create a powerful home security network. No PC interface is needed to view video on your smartphone or wireless devices. Set up the camera network on your mobile device and install the cameras; your network is up and running.
The wireless AppCam offers superior quality video with true color. It is suitable for day or nighttime use.
Also, as dust, grime, and cobwebs accumulate on the camera glass, they can reflect light from the infrared LED and might lower video quality. Periodically clean the lens glass with a soft cloth.
FEATURES
System
• No PC required
• Direct connection to router
• WiFi connection to router
• P2P connection
• Records HD 720P up to 20fps
• Manual/motion recording to microSD
• Supports up to 32GB microSD
• High quality H.264 video
• Two-way Audio
AppCam Pan/Tilt Indoor Camera
• IR cut filter switch
• Night vision range – 25 feet
• Built-in microphone and speaker
• microSD card slot
Uniden’s AppCam App
• Multiple camera viewing and management from single app
• Remote access to recorded video
• Remote snapshot & recording control
• Event notification/email alert
WHAT’S INCLUDED

If any items are missing or damaged
contact our Customer Care Line immediately at +1-800-658-8068.
Never use damaged products!
PARTS OF THE CAMERA

Buying a 3D Printer? - What You Need to Know
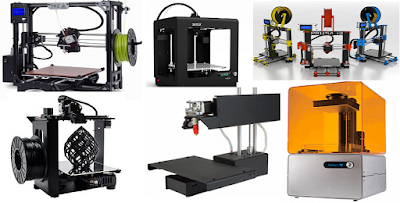
With the number of desktop 3D printers sold annually expected to see grow by a staggering 750% by 2019, and with the number of different machines on the market mushrooming over the last two years, it has come to our attention that an ever growing number of consumers are simply becoming overwhelmed. Way back in 2012 when I first purchased a 3D printer there were only a handful of reliable machines available on the market. Fast forward to 2015 and there are literally hundreds. Priced anywhere from $249 all the way up to thousands, I, myself, even feel a wee bit overwhelmed when friends ask me what they should buy.
If you are in the market for a new 3D printer, then there are a lot of decisions ahead of you. We’ve decided to put together a small guide which can be used in conjunction with our “Best 3D Printers of 2015” review article to hopefully help you select and buy the 3D printer which suits you and your activities best.
Buying a 3D Printer – A Starting Point…
When the typical consumer sets out to purchase a new 3D printer, they usually start with Google, or head directly to Amazon. Both are great starting points, but from a research perspective only. Use Amazon initially to read reviews on each product, noting that there are cheaters out there and not every review is legitimate. Next you should head over to the 3D Hubs 3D Printer review page, which takes into account, according to the company, 2,279 reviews, 335 writing hours, 1,623 years of experience, and over 317,000 individual prints to present a full picture of the consumer 3D printing space. Note that there is a ton of information on Amazon, Google, 3D Hubs. It’s impossible to take it all in, but very important that you spend time at least learning about the machines which consistently receive the better user reviews.
Price Doesn’t Mean Quality

Next it’s time to determine your budget. Money doesn’t grow on trees, but plastic objects do grow on all 3D printers. Don’t let the price tags fool you. There are many excellent machines available for under $1000, and a handful of great r3machines one can pick up for under $600. Don’t think that you need to spend $3,000 to really get involved with 3D printing. Price does not equate to quality all the time. I’ve used $500 printers which I thought worked better than $1,800 machines, while I’ve also used $500 machines which I would have been better off dropping off at the landfill than in my garage. Once again it all comes back to reading reviews and understanding what you need the printer for.
Money Spent Now = Money Saved Later
Contrary to what we just stated in the previous bullet point, oftentimes spending a little bit of extra money now could equate to savings in excess of that amount down the road. Let me explain…
I have 8 3D printers now. I like trying new machines and also received a few for review articles we’ve done. While price does not always mean quality, there have been a couple machines that I received which retail for around $500. One of these machines, in my opinion, was a total waste of time. I ended up spending $100 in filament alone because every time I left the the printer for a r2few hours to do its thing, I would return to find a 3D printed Salvador Dalí murder scene in my garage with melted filament strands strewn across the build plate like someone’s intestines had just ruptured. Frankly if you were to purchase this printer (I won’t mention the name right now) you’d likely be forced to buy a new one within months. Avoid such a mishap by reading reviews thoroughly!
Understand Your Abilities
This is one of the most important points. Those jumping into 3D printing for the first time, with little to no experience, often purchase the cheaper machines. While many of these machines work exceptionally well, a majority of them are very rudimentary. If there is a problem it might not be so easy to fix, and likely there are no features such as print bed auto-calibration, cloud-based printing, WiFi connectivity, etc., which make 3D printing a bit easier for the beginner. On the other hand if you have had experience with machines like these before, or are a mechanical genius, then it might r4benefit you to buy one of the more rudimentary, affordable 3D printers out there.
Know Your Ultimate Goals:
Like I’ve mentioned before, there are hundreds of 3D printers out there to choose from. Just like with any other major purchase, whether it’s a car, smartphone, or computer, not every item is right for you. You likely wouldn’t buy a sports car if you had a family of 7, just like you wouldn’t buy a minivan if it’s just you and your wife. 3D Printers are the same. Many of the machines and the technologies behind them are suited for specific uses. It’s important you understand the differences between each particular feature, technology, and specification. Spend some time learning about 3D printers in general before you even begin considering a purchase.
Buying a 3D printer can be an enjoyable, but oftentimes scary experience. If you come in prepared, invest the time necessary in researching the industry and understanding your needs, you’ll likely find a printer which provides years of useful fabrication.
How to enter my Unlock Code for BlackBerry Storm ?
Model : BlackBerry Storm 9300 and 9350
Follow all the steps very patiently and carefully.
Instructions - Step by Step
1. Insert ANY Sim Card in the Phone's Sim Card Slot.
2. From the Home Screen, Press the Menu Key (Blackberry Key), and Select 'Manage Connections'.
3. Turn OFF all of the Wireless Connections.
4. Go Back One Step by Pressing the Back Key.
5. Select Options.
6. Select Advanced Options.
7. Select SIM Card.
8. Press the Menu Key Select 'Show Keyboard'.
9. Tilt the phone in Horrizontal Position so that the Keyboard is displayed in the Landscape Mode.
10. Enter letters M E P D (you will not be able to see the typed info).
11. Enter letters M E P and then the number 2.
12. A Message will say "Enter Network MEP Code".
13. Enter the Code provided by us to you and Press the Enter Key on the Screen.
14. It will now say 'Code Accepted'.
15. Congratulations! Your phone is now Unlocked. Now your phone can be used with any GSM Network with Sim Card.
16. Go back to the Home Screen. Press the Menu Button and click on Manage Connections.
17. Turn all the Connections ON.
18. Click on Mobile Network Options > Network Technology: - Change GLOBAL to GSM/UMTS | Below that you will see - Network Mode: - Change from | 3G and 2G | to | 2G |.
In Some Cases, the Phone might need to be Rebooted/Restarted with a Valid and Active GSM Sim Card placed in the Phone's Sim Card Slot.
You must follow Steps 16, 17 and 18 to switch the phone from CDMA (Verizon) mode to GSM mode.
IMPORTANT: Kindly Leave Me a Positive Feedback with 5 Detailed Stars; If you bought this code on my eBay listing, so other customers know how fast and accurate i am, and how happy you are with my service!
If it says ''Activation Required'' or your own Mobile Number doesn't appear on the Dial Pad Screen then follow these instructions below.
Go to the Dial Pad Screen and press # # 0 0 0 0 0 0 and press the Send button.
You will then see a menu come up. Erase everything on the first row and Input YOUR number. Press the Menu Key and click Save.
The phone will now reboot and ''Activation Required'' will no longer be displayed.
PUSH MOWER BUYING GUIDE

How To Find The Perfect Push Mower For Your Needs
Buying a lawn mower may seem like a routine task. But to ensure that you buy the lawn mower that best meets your specific needs you’ll want to factor in the size of your yard, whether your yard is hilly or flat, the number of trees or other obstacles to mow around, as well as the needs of the person doing most of the mowing.
There are many different lawn mowers on the market to meet a variety of lawn mowing needs. A mower that is perfect for your neighbor may not be the right one for you.
To find a mower that meets your needs, follow the tips we’ve assembled for you in this helpful buyer’s guide
What Mower Is Right For You, Push or Self-Propelled?
Push Mowers are ideal for flat yards under ¼ acre. Their cutting deck ranges from 20-22 inches, which is the perfect size to quickly and efficiently make your lawn look beautiful. If you are in good physical condition this may be a great way to save when purchasing a new lawn mower.
Self-Propelled Mowers are perfect for yards up to ¾ acre. The mower actually pushes itself to reduce fatigue that may come with a push mower. You simply walk behind the mower to control its path. Self-Propelled lawn mowers offer both front and rear wheel drive to better suit your yard. See below to determine which is right for you:
Front-drive push mowers are remarkably easy to maneuver and turn. Swivel front wheels make this possible by allowing easy 180-degree turns. These are perfect for smaller yards with numerous obstacles.
Rear-wheel drive mowers have better traction on hills and better steering control, but may make it a little harder to make sharp turns. These mowers are suited for open yards with steep hills.
If your lawn is larger than ¾ acres you may want to consider a Riding Lawn Mower.
Lawn Mower Features: Choosing The Features Right For You
Starting Systems - An easy-starting lawn mower is one of the most important features to get the job started right. That’s why selecting the right starting system is vital in ensuring you a hassle-free lawn mowing experience.
Electric Starting Systems eliminate pull starts all together. Simply prime the engine and turn the key for quick, dependable starts without any maintenance required.
Automatic Choke Starting Systems come ready to run. Simply engage the safety handle and pull the starter rope for a hassle free start that completely eliminates priming or choking.
Primer Starting System pumps the exact amount of gas into the carburetor to allow quick and easy one pull starts.
No Prime. No Choke. No Problem The ReadyStart™ system from Briggs & Stratton helps eliminate the strain and the hassle of starting your lawn mower. Manual priming and choking are now a thing of the past. Simply pull the rope and mow. The ReadyStart™ system makes starting Briggs & Stratton power products easier and faster.
What To Do With The Clippings
Bagging is a technique used to catch cut grass. They are available as both rear and side bagging mowers. Rear bagging mowers give you more maneuverability around trees and landscaping throughout your yard. Bagging leaves you with a fresh looking lawn every time you mow.
Mulching mowers use mulching blades that cut the grass into fine piece and return them to your lawn to act as a natural fertilizer. This works to enhance your lawn and does not require any extra time or money. It also eliminates the time you may spend emptying the grass out of a bagging mower.
Additional Features
Leaf-Handling Capability. These mowers suck up, shred and catch leaves with a screen that goes between the cutting blade and the discharge chute. Several newer mowers offer this unique feature.
Sound Quality: Briggs & Stratton offers specially designed mufflers to reduce to the sound of your mower during operation.
Durability: When purchasing a lawn mower, look for engine features like Maxi-Clean™ filters and overhead value technology (OHV) that help make your lawn mower engine last a lifetime.
Safety Tips: Be Careful Out There
According to the US Consumer Product Safety Commission, more than 60,000 injuries are treated by hospital emergency rooms each year because of unsafe operation of power lawn mowers. Kids under the age of 15 are the most common victims. Regardless of which mower you choose, don’t forget to practice safety. We’ve assembled some guidelines below to help keep you safe while using your equipment:
Always wear protective eyewear.
Mow only in daylight, when the grass is dry.
Check your yard for any debris or objects, such as toys that could pose a hazard if you mowed over them.
Keep you children and pets out of the mowing area.
Never let the starter rope snap back when starting a mower.
Look three to four feet directly ahead of you while mowing.
Never tilt a mower; always keep all four wheels on ground.
Take special care when mowing hills and inclines:
With your push mower, always mow across an incline or hill
Always turn off mower when crossing a sidewalk or driveway.
Never adjust mower height, clean grass chute, remove grass catcher or repair the mower while the engine’s running.
Never de-activate safety devices.
Never pull mower towards you.
Always stay clear of a hot engine. Mufflers can reach up to 1,200˚F.
Always read your Operator’s Manual thoroughly before operating the mower.
Children under 12 should not operate a push mower.
Maintenance Tips: For Long Life and Safety
Lawn mowers are built to last. However, as with any power product basic maintenance can be the difference in ensuring that your investment lasts a lifetime. Below is a basic maintenance schedule that should be followed by every lawn mower owner:
Check Oil Level - Every 5 hours
Change Oil - 50 Hours or every season
Replace Oil-Foam Element- 25 Hours or Every season
Replace air-cleaner cartridge - 25 Hours or Every season
Clean cooling system - 100 Hours or Every Season
Inspect spark-arrester - 50 Hours or Every Season
Replace in-line fuel filter - 50 Hours or Every Season
Replace spark plug - 100 Hours or Every Season
Clean combustion chamber deposits - Every 100-300 Hours
Tips for Buying a Smartphone

Purchasing a smartphone is exciting, but it can also be overwhelming to many buyers. Numerous makes and models exist. Buyers also must navigate complex computer language to determine which features and systems are necessary. While this decision can be complex, it is one worth making carefully only after considering all factors since these phones can be expensive. Many of the best models of smartphones are available on eBay from numerous vendors. To buy a smartphone, buyers should consider a few tips to help them to navigate the more complex aspects of this buying decision. That way, the buyer purchases a cell phone that lasts for years and provides excellent service.
Focus on Operating Systems
The operating system is the brain of the smartphone. The most common options include the Android smartphones, Apple iOS systems, and Windows mobile devices. Individuals often select the iOS system because they want the benefits of an iPod in an iPhone. This system also features the Safari web browser. Individuals purchasing an Android phone have access to a wide range of programs and browsers since this is a more flexible platform. The Windows-based smartphones allow users to benefit from having access to Office products, including Word and Excel, on their phones.
Consider Brands and Models
For many people, buying a smartphone often comes down to buying the latest model or the most advanced phone. When considering some of the larger brands in the industry, factor in aspects such as features, flexibility of use, and availability on a particular phone carrier.
Numerous other brands and models exist. When selecting one to buy, individuals need to consider how they plan to use the device. Some models, including the Galaxy, Note, and Droid phones are known for their improved communications, making them a good option for business use. The Apple iPhone 5, for example, is a comprehensive media device, aimed at the individual user who wants access to photos, music, and the Internet.
Factor in Connectivity Options
When purchasing a smartphone, many people consider the phone carrier they intend to use. However, it is also important to consider the number and type of connection tools available to the user through the phone. Many smartphones have ample features when it comes to connectivity.
Bluetooth and Wi-Fi
A Bluetooth smartphone allows individuals to connect to any device featuring Bluetooth technology. Wi-Fi smartphones allow the user to switch off mobile data, such as 3G or 4G networks, and to use in-house Internet-connectivity. This can reduce costs.
Other Connection Options
Some smartphones connect through USB ports. For a user who travels internationally, a Global System for Mobile Communications smartphone, also known as a GSM smartphone, is ideal. It is important for users to consider usability with their preferred carrier, too.
Determine Which Features are Ideal
Based on the way the buyer plans to use his or her smartphone, it is essential to consider features. Some people have preferences to one style of phone or another. Technology continues to update and new features continue to become available.
Keyboards
A QWERTY keyboard pulls out from the phone and allows the user to type on keys, much like a traditional computer keyboard. Many people purchase touchscreen smartphones. These have built-in keyboards that operate based on an on-screen keyboard.
Cameras
Smartphones with cameras are very common. The quality of the camera tends to differ from one model to the next. When comparing options, buyers need to factor in the number of megapixels, the zoom quality, and the overall quality of images. Many also feature video cameras and media players to allow for on-screen viewing.
How to Buy a Smartphone
The selection of a smartphone requires the buyer to consider his or her desired features and specs. With numerous options available on eBay, buyers have the ability to easily compare various makes and models online and within a matter of seconds. To do so, buyers can visit any page of the eBay website and use the search bar on the screen to locate a specific brand, style, or operating system available. Then, the consumer can navigate through various vendors to locate a new or used cell phone, a locked or unlocked phone, or one with specific features. By comparing numerous options, it is possible to narrow down the buying decision until the ideal investment is possible.
Yuneec Typhoon Q500 4K review

Yuneec's Typhoon Q500 4K is not your average drone. Slung from the belly of the $1,300 quadcopter (£960 AU$2,200) is a 4K-resolution camera combined with a three-axis antivibration gimbal. When not in the air, the camera-and-gimbal system can be quickly removed and attached to the included SteadyGrip, a battery-powered handheld mount that lets you use the Typhoon's camera on the ground. Combined with an iPhone or Android smartphone, you can shoot completely control the camera and see what you're shooting. (Yuneec makes an updated and improved version of the SteadyGrip called ActionCam with a built-in rechargeable battery and the Q500 4K's CGO3 camera.)
The DJI Inspire 1 series takes a similar approach, but it's targeted at professionals and starts at about $2,700 for the drone and the handheld camera mount is an additional $270. The Typhoon Q500 4K is a better option for beginners, giving you an aerial and ground imaging solution that, while maybe not as feature-filled as some competing models, does what it does very well.

Design and features
The Q500 4K is big. Not like "How does that thing get off the ground?" big, but next to the relatively compact DJI Phantom 3, it's big. (The diagonal motor-to-motor measurement is 390mm for the Phantom compared to the Typhoon's 510mm.) The size does make it easier to spot in the sky from a distance, but you're not sliding the Q500 4K easily into a backpack for a trip to the park.
Instead Yuneec packs everything into a large, sturdy case. Along with the drone and its camera you'll find two batteries and a charger; two sets of propellers; the ST10+ controller, a neck strap and sunshield; a cable to use the charger in a car; and the SteadyGrip handheld mount. Unfortunately, Yuneec used Styrofoam inside the case instead of something a bit more long-lasting.
The Styrofoam is representative of the design and build quality on the whole: it's a good package overall, but lacks some polish. The black-and-gray plastic body looks nice, but pick it up and it feels a little flimsy. It's great that the camera can be removed, but to do it you have to keep plugging and unplugging this small cable and pushing in a plastic tab, both of which I feel might not last with frequent use. Nothing that's a deal breaker, but a little disappointing.

The controller for me is definitely a plus, though. Instead of relying on a tablet or smartphone for a live view from the camera as well as flight information, the ST10+ has a built-in 5.5-inch touchscreen display built right in. There's a bit of lag between the camera and screen, so I wouldn't recommend flying by FPV alone, but for setting up shots and giving you telemetry data at a glance it's great. It also means you only have to worry about having the controller charged, not a second device.
Having the fixed screen does mean you can't go with a larger tablet display, but since the drone doesn't support waypoint navigation -- where a larger screen to set up an autonomous flight path comes in handy -- and FPV flying isn't a great idea, it's not a big loss.
The controller also has buttons for starting and stopping video recording and snapping photos and sliders for setting the camera angle and limiting overall climb/descend and directional speed. A switch lets you move between flight modes: Smart, Angle and Home.
Smart mode is made for beginners. In addition to enabling a virtual barrier called a geofence to prevent it from flying more than 300 feet away from the pilot, the controller will always move the Q500 4K in the direction the right-hand control stick is pushed relative to the pilot and no matter which way the nose is pointed. It's fine if you've never flown before and you use it just to get a feel for how the quadcopter will fly, but I don't recommend using it much beyond that.
However, Smart mode is the only way you can use two of the drone's main attractions: Follow Me and Watch Me modes. With Follow Me, the drone uses a GPS signal from controller to follow whoever or whatever is carrying it. Watch Me mode works similarly, but keeps the controller -- or whoever's holding it -- framed in the camera no matter where and how it moves and the camera can automatically tilt according to the controller.
Carrying around a big controller doesn't make for the best video, though, so Yuneec developed the Wizard remote control. It's about the size of a TV remote, but can completely control the drone with simple gestures and a directional pad. It also has GPS in it, so it can be used with the Q500 4K's Follow Me and Watch Me functions.
If you want to actually pilot the Q500 4K normally, just switch into Angle mode. This will move the drone in the direction the control stick is pushed relative to the nose of the aircraft. As long as you've got a lock on six or more GPS satellites, the Q500 4K will automatically hold its position and hover in place when the right-hand stick is centered.
The Home mode is the drone's return-to-home safety feature. Flip the switch down and as long as the drone has a solid GPS lock and there are no obstacles in the way, it will fly back to within 13 to 26 feet (4-8 meters) of the pilot and automatically land.
Flight
Setting up the Typhoon Q500 4K for flight is about as simple as it gets. Spin on the props, charge up the batteries for the drone and controller and you're done. The controller, which is running on Android, takes a minute to boot up and then, once you've turned the drone on, it takes another minute for the two to finish connecting. GPS satellite acquisition -- required for hovering in place and return-to-home among other things -- takes a little more time. All told, it took me about 3 to 5 minutes until it was ready to fly, basically depending on how fast I could lock onto more than six satellites.
There is no automatic takeoff, but the procedure is simple enough: Press and hold a button on the controller to set the motors spinning and press up on the left stick. There is also no automatic landing, though you can just switch to Home mode and it will land for you. Honestly, other than bouncing a bit when it's close to the ground, the Q500 4K is stable enough for beginners to take off and land without issue.
As long as it's locked onto plenty of satellites, flying is easy. It's not particularly zippy, but that's kind of a plus when you're learning to fly for smooth camera movements. It is remarkably quiet, too. Yes, you'll still hear it, but it's more like the sound of a fast-spinning fan than an electric leaf blower.

I occasionally experienced some erratic flight behavior, but calibrating the drone's compass seemed to straighten it out. The procedure isn't difficult, though the drone's size makes it awkward since it involves turning and rotating the copter several times. Also a recent firmware update improved performance all around. (That procedure requires little more than connecting the Q500 4K to a computer via USB.)
All in all, flying the Typhoon is a pleasurable experience. Flight times for me averaged around 20 minutes before the controller started warning me to land, which is typical battery life at the moment for this category. Perhaps because of its larger size, it moved smoothly and while there is some lag between the camera and the what's displayed screen, the controls were responsive.
Video quality
Yuneec gives you several resolutions to choose from for video, the highest being 4K Ultra HD (3,840x2,160 pixels) at 30 frames per second, but also does high-speed video in full HD (1,920x1,080 pixel) at 120fps for slow-motion. It records at a high bitrate of 50Mbps, and it shows in the details. Subjects look sharp (maybe a little too sharp), though on my camera subjects on the far left side appear softer.
The three-axis gimbal does a fine job of keeping the camera stable, so even if you're not making steady moves with the drone it won't show in your clips. You'll still see some of the effects of rolling shutter, but that's typical for the category. The video is best viewed at small sizes in general, so if your goal is to share your videos online and watch them on a phone or tablet, the Q500 4K's camera will yield some excellent clips.
Conclusion
Thanks to some useful accessories and a solid feature set, the smooth-flying, easy-to-use Yuneec Typhoon Q500 4K quadcopter is a compelling package for video and photos in the sky or on the ground. The design is a little rough around the edges, and if you want autonomous flight features like waypoint navigation, you're out of luck. Otherwise, this is one nice drone for the money.
A visual Ultimaker troubleshooting : Stringing / Ringing
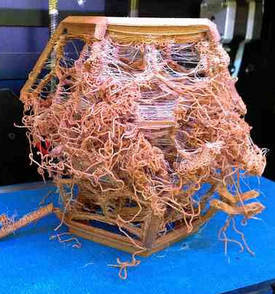
Stringing

The primary countermeasure for stringing is something called retraction. When you have retraction enabled the printer will "suck" the filament back a short distance before moving the print head over an open space. By sucking the filament in a bit it helps prevent plastic from dripping from the nozzle during the travel move.
So what you should do first is to make sure that retraction is actually enabled in cura. This setting is found on the "Basic" tab in the form of a checkbox when you are in the full settings mode (Expert -> Switch to full settings...). Make sure this box is checked. You can check if retractions will happen without printing by looking at the layer view in cura after slicing your object. You switch to layer view with the big button in the upper right corner of the window. The retractions are indicated by small blue lines that go from the print and straight up. It can sometimes be tricky to see these lines without zooming in and rotating the view around.
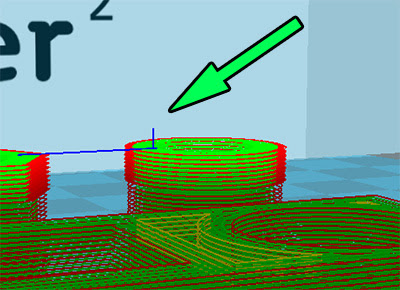
As you can see it can be hard to spot these small lines unless you zoom in for a closer look. The other blue line indicates the travel move that the retraction is preparing for.
Another thing you can do to lessen the effect of stringing is to increase the travel speed. By default the travel speed is set to 150mm/s but you can increase this to 250mm/s. By increasing the travel speed you give the head less time to ooze plastic but you also help snap off any strands that form instead of dragging them along.
Temperature can also play a part. Experiment with a lower temperature.

This image shows clearly how lowering the temperature has a very positive effect on the amount of stringing. As always when lowering temperature you must also make sure that you are printing slowly enough to prevent under extrusion. Note that the temperatures shown in this image is for PLA, for other materials you may not be able to go this low. Or conversely, you may be able to go even lower.
On the Ultimaker2 the speed and length of the retraction is set on the printer. The default values work well but feel free to play around. Increasing the retraction length for example can make up for sloppiness in the connection of the bowden tube to the print head.
Finally it should be noted that some filaments are simply prone to stringing and no matter what you do it might be all but impossible to completely eliminate them. Even different colours from the same manufacturer can differ in how much they string.
Ringing

Ringing is what we call the small waves or shadows that usually appear around sharp corners on a print. It's often very apparent if you have text on your print as you will see what looks like shadows of the text. This happens when the print head makes a sudden direction change and the inertia of the head causes vibrations that show up in the print. To combat this there's a couple of things you can do. Simply slowing down your print speed will help lessen the effect. Decreasing the acceleration of the printer will make a big impact on the reduction of ringing without affecting print speed too heavily. You adjust this setting by going into the advanced settings on the printer itself Maintenance -> Advanced -> Motion settings. Try 3000 or 1500 and see how that affects your print.
There's also another defect that can look like ringing while it actually isn't. Something that can happen is that infill shows through to the outside layer. This can look similar to ringing. To get rid of this the solution is to print thicker outer walls to hide the infill. Try printing at least two outer shells which, with a standard nozzle, will equate to 0.8mm thick walls.
By default cura will print the infill before the walls, this makes it more likely that the infill will show through to the outer wall. The reason for printing in this order is because it helps with overhangs. But you can try reversing this order by going into Expert -> Expert settings and checking "Infill prints after perimeters"
Excessive temperature can also cause strange vertical lines in a print. Try lowering the temperature slightly and see if that helps.
Yet another thing to try is to rotate your part 45 degrees on the print bed. Some users have reported that this has gotten rid of vertical lines on the print.
Print Quality Troubleshooting Guide : Not Extruding Enough Plastic
Not Extruding Enough Plastic
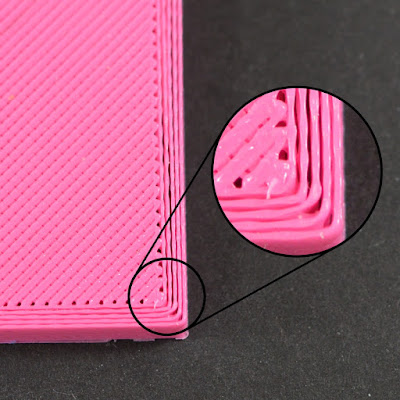
Each profile in Simplify3D includes settings that are used to determine how much plastic the 3D printer should extruder. However, because the 3D printer does not provide any feedback about how much plastic actually leaves the nozzle, it’s possible that there may be less plastic exiting the nozzle than what the software expects (otherwise known as under-extrusion). If this happens, you may start to notice gaps between adjacent extrusions of each layer. The most reliable way to test whether or not your printer is extruding enough plastic is to print a simple 20mm tall cube with at least 3 perimeter outlines. At the top of the cube, check to see if the 3 perimeters are strongly bonded together or not. If there are gaps between the 3 perimeters, then you are under-extruding. If the 3 perimeters are touching and do not have any gaps, then you are likely encountering a different issue. If you determine that you are under-extruding, there are several possible causes for this, which we have summarized below.
Incorrect filament diameter
The first thing you want to verify is that the software knows the filament diameter that you are using. You can find this setting by clicking “Edit Process Settings” and going to the Other tab. Check to make sure that this value matches the filament that you purchased. You may even want to measure your filament yourself using a pair of calipers to make sure that you truly have the correct diameter specified in the software. The most common values for the filament diameter are 1.75mm and 2.85mm. Many spools of plastic also include the correct diameter on the packaging.
Increase the extrusion multiplier
If your filament diameter is correct, but you are still seeing under-extrusion issues, then you need to adjust your extrusion multiplier. This is a very useful setting in Simplify3D that allows you to easily modify the amount of plastic that is extruded (otherwise known as the flow rate). You can find this setting by clicking “Edit Process Settings” and going to the Extruder tab. Each extruder on your printer can have a unique extrusion multiplier, so if you are trying to modify the flow rate for a specific extruder, make sure to select it from the list on the left to load the settings for that extruder. As an example, if your extrusion multiplier was 1.0 previously and you change it to 1.05, it means you will be extruding 5% more plastic than you were previously. It is typical for PLA to print with an extrusion multiplier near 0.9, while ABS tends to have extrusion multipliers closer to 1.0. Try increasing your extrusion multiplier by 5%, and then reprint the test cube to see if you still have gaps between your perimeters.
Subscribe to:
Posts
(
Atom
)


 Return to top of page