Stringing

The primary countermeasure for stringing is something called retraction. When you have retraction enabled the printer will "suck" the filament back a short distance before moving the print head over an open space. By sucking the filament in a bit it helps prevent plastic from dripping from the nozzle during the travel move.
So what you should do first is to make sure that retraction is actually enabled in cura. This setting is found on the "Basic" tab in the form of a checkbox when you are in the full settings mode (Expert -> Switch to full settings...). Make sure this box is checked. You can check if retractions will happen without printing by looking at the layer view in cura after slicing your object. You switch to layer view with the big button in the upper right corner of the window. The retractions are indicated by small blue lines that go from the print and straight up. It can sometimes be tricky to see these lines without zooming in and rotating the view around.
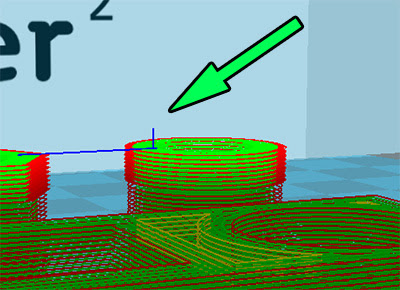
As you can see it can be hard to spot these small lines unless you zoom in for a closer look. The other blue line indicates the travel move that the retraction is preparing for.
Another thing you can do to lessen the effect of stringing is to increase the travel speed. By default the travel speed is set to 150mm/s but you can increase this to 250mm/s. By increasing the travel speed you give the head less time to ooze plastic but you also help snap off any strands that form instead of dragging them along.
Temperature can also play a part. Experiment with a lower temperature.

This image shows clearly how lowering the temperature has a very positive effect on the amount of stringing. As always when lowering temperature you must also make sure that you are printing slowly enough to prevent under extrusion. Note that the temperatures shown in this image is for PLA, for other materials you may not be able to go this low. Or conversely, you may be able to go even lower.
On the Ultimaker2 the speed and length of the retraction is set on the printer. The default values work well but feel free to play around. Increasing the retraction length for example can make up for sloppiness in the connection of the bowden tube to the print head.
Finally it should be noted that some filaments are simply prone to stringing and no matter what you do it might be all but impossible to completely eliminate them. Even different colours from the same manufacturer can differ in how much they string.
Ringing

Ringing is what we call the small waves or shadows that usually appear around sharp corners on a print. It's often very apparent if you have text on your print as you will see what looks like shadows of the text. This happens when the print head makes a sudden direction change and the inertia of the head causes vibrations that show up in the print. To combat this there's a couple of things you can do. Simply slowing down your print speed will help lessen the effect. Decreasing the acceleration of the printer will make a big impact on the reduction of ringing without affecting print speed too heavily. You adjust this setting by going into the advanced settings on the printer itself Maintenance -> Advanced -> Motion settings. Try 3000 or 1500 and see how that affects your print.
There's also another defect that can look like ringing while it actually isn't. Something that can happen is that infill shows through to the outside layer. This can look similar to ringing. To get rid of this the solution is to print thicker outer walls to hide the infill. Try printing at least two outer shells which, with a standard nozzle, will equate to 0.8mm thick walls.
By default cura will print the infill before the walls, this makes it more likely that the infill will show through to the outer wall. The reason for printing in this order is because it helps with overhangs. But you can try reversing this order by going into Expert -> Expert settings and checking "Infill prints after perimeters"
Excessive temperature can also cause strange vertical lines in a print. Try lowering the temperature slightly and see if that helps.
Yet another thing to try is to rotate your part 45 degrees on the print bed. Some users have reported that this has gotten rid of vertical lines on the print.
Tag:
3D Printers User Guide
,
News Tech


 Return to top of page